
Quick Answer: An eSIM (embedded SIM) is the fastest, most reliable way to secure high-speed mobile data across Japan without swapping physical SIM cards or carrying a pocket Wi-Fi device. Service providers like Saily deliver instant digital activation on major local Japanese infrastructure—including NTT Docomo (over 99% population coverage) and SoftBank—with prepaid data tiers starting as low as $3.99 for 1 GB up to $24.99 for 20 GB or flexible unlimited data packages. By routing through Japan’s national 4G LTE and 5G networks, travelers enjoy average urban download speeds between 50 and 150 Mbps, ensuring seamless navigation via Google Maps, real-time translation, and transit routing on the Shinkansen.
Why Choose an eSIM for Traveling in Japan?
Travelers to Japan traditionally relied on renting pocket Wi-Fi routers at major hubs like Narita (NRT) or Kansai (KIX) airports. However, pocket Wi-Fi requires daily charging, physical pickup/return, and bulky carrying.
Physical travel SIM cards present their own hassles, including tiny plastic chips, pin tools, and the risk of losing your primary domestic SIM card.
An eSIM solves these operational challenges by embedding a programmable microchip directly into your smartphone. According to telecom performance metrics from Opensignal, Japan ranks among the world’s most connected nations, with 4G/5G availability reaching 97.8% to 99.0% across leading networks. Activating a digital profile before departure grants instant data access the second your plane touches down in Tokyo or Osaka.

Which Japanese Network Carrier Provides the Best Coverage?
Japan’s mobile telecommunications market is dominated by three major network operators: NTT Docomo, KDDI (au), and SoftBank. Selecting an eSIM provider that partners with the right host network ensures uninterrupted service across diverse travel routes.
NTT Docomo: The incumbent national carrier covering roughly 99% of Japan’s landmass. Docomo is the gold standard for travelers visiting rural regions, hiking the Japanese Alps, or commuting through mountain tunnels on the Shinkansen bullet train.
SoftBank: Highly optimized for high-density urban corridors. SoftBank excels in major metropolitan areas like Shinjuku, Shibuya, and Dotonbori, offering exceptional latency speeds during peak congestion hours.
KDDI (au): Delivers balanced nationwide coverage (98% population coverage) with strong consistent quality scores across central Japan.
“For urban travel in Tokyo or Kyoto, both SoftBank and Docomo perform flawlessly. But if your itinerary includes off-the-beaten-path destinations like Tohoku or rural Shikoku, choosing an eSIM tied to NTT Docomo prevents dead zones entirely.”
— Kenji Takahashi, Senior Telecommunications Analyst
How Do Top Japan eSIM Providers Compare?
To help you decide on the ideal plan for your stay, the table below compares key data tiers, host networks, and activation features across leading travel eSIM options.
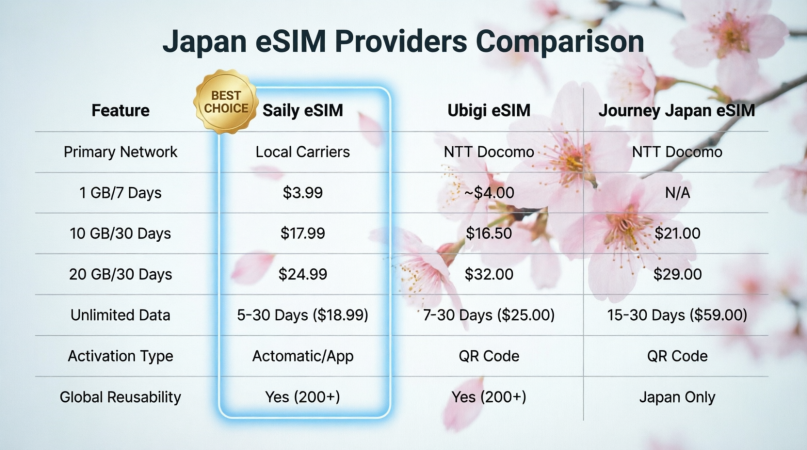
| Feature / Metric | Saily eSIM | Ubigi eSIM | Journey Japan eSIM |
| Primary Network | Local Japanese Carriers | NTT Docomo (5G) | NTT Docomo |
| 1 GB / 7 Days | $3.99 | ~$4.00 | N/A |
| 10 GB / 30 Days | $17.99 | $16.50 | $21.00 |
| 20 GB / 30 Days | $24.99 | $32.00 (25GB) | $29.00 |
| Unlimited Data | 5 to 30 Days (from $18.99) | 7 to 30 Days (from $25.00) | 15 to 30 Days (from $59.00) |
| Activation Type | Automatic / App-based | QR Code / App-based | QR Code / Manual |
| Global Reusability | Yes (200+ destinations) | Yes (200+ destinations) | Japan Only |
How to Set Up and Activate a Saily eSIM for Japan
Setting up an eSIM through Saily is straightforward and requires no physical store visits or passport registration counters at the airport. Follow these step-by-step instructions before embarking on your trip.
Ensure your smartphone is carrier-unlocked and supports eSIM technology (e.g., iPhone XS or newer, Samsung Galaxy S20+, Google Pixel 4 or newer).
Install the free Saily app from the App Store or Google Play Store. Select Japan as your destination and choose a plan that matches your trip duration—ranging from 1 GB up to 20 GB or unlimited data options.
Follow the in-app prompts or scan the provided QR code to download the digital SIM profile onto your phone. Label the new cellular plan as “Travel” or “Saily” in your device settings.
Once you land in Japan, toggle your mobile data line to your Saily eSIM and enable Data Roaming in your cellular settings. The plan automatically activates upon connecting to the local Japanese cell tower.
Frequently Asked Questions About Japan eSIMs
Can I make phone calls with a travel eSIM in Japan?
Most travel eSIMs for Japan are data-only profiles, which allow VoIP calls via apps like WhatsApp, FaceTime, LINE, or Skype. However, Saily also offers optional phone number add-ons and call/text packages directly inside the Saily app for travelers requiring full voice capability.
How much mobile data do I need for a 10-day trip to Japan?
For standard navigation, checking train schedules on Suica/Pasmo apps, and posting social media updates, 1 GB per day (or a 10 GB 30-day package) is usually ideal. If you stream video or work remotely, consider a 20 GB fixed plan ($24.99) or an unlimited data tier.
Does my phone need to be unlocked to use a Japanese eSIM?
Yes. Your device must be unlocked by your home carrier. Carrier-locked phones will reject third-party eSIM profiles regardless of destination.